It is imperative that you know how much your stance is open or closed at address for your stock swings as well as for your
specialty swings.
For example, for my students that want more distance with their driver, I usually have them set up two or three inches closed to
square, and I have them observe their
ball position well forward in their stance. The ball position is easy enough to recognize and memorize, but the precise
distance that they
close their stance requires measurement, then practice to be repeatable.
Here's how it's done:
- First I have the student set up in a square stance with their feet parallel to each other, square to their stance line.
Then I have them open their front foot one inch, then the back
foot one inch. Then I have them recognize that they are standing in a square stance with their feet open about an inch to their
square stance line.
- Then I have them close their stance by dropping their rear foot about two inches back from the square stance setup line. Then
I have them open their front foot one inch, then the back
foot one inch. Then I have them recognize that they are standing in a closed stance with their feet open about an inch to their
closed stance line.
The width of their feet is the same as if it were a square setup with open feet, but their body lines point right of
a direct ball to target aimline.
- Then I repeat the process with an open stance.
- Then we take a moment to make sure that the student understands that stance angles and foot angles are different things.
- Next I set them up in a two inch closed stance by having them drop their right foot back approximately two
inches, with their toes open to their stance line. Then we use some tools to measure exactly
how closed their stance is as follows:
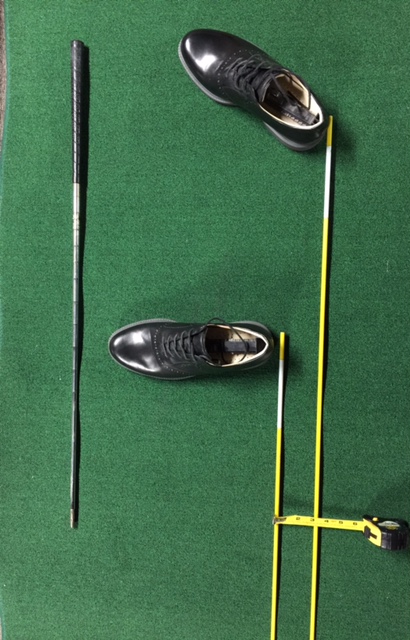
- I lay an alignment rod on the ground,parallel to their ball to target aimline, with the end of the rod right behind their
left heel,
pointing outward
in the general direction of the target, parallel to the ball to target aimline. The rod extends from behind their heel,
parallel to their ball to target aimline (not their closed stance line), pointing in the general direction of the target
- Then I take another alignment rod and lay it down the same way behind their right heel.
- Now I have two alignment rods on the ground parallel to each other, parallel to the ball to target aimline
(not the closed stance line)
pointing in the general direction of the target.
See photo above
- Next, I measure the distance between the rods in inches. That tells you in inches how far back the right heel is behind
the left heel, which I refer to as the number of inches that the stance is closed. It's most often two or three inches, which
I call a two or three inch closed stance.
- Then we experiment with a one, two or three inch closed stance to see which one works best for their intended ball flight.
- The student is then instructed to practice this at home by setting up in a two or three inch closed stance
(whatever we ended up with at the lesson) to a ball with a driver in hand.
- They measure it to be sure, then they place a quarter (or a tee if you are outdoors on grass)
behind each heel. Then they remove the alignment rods, and practice stepping
into their driver
stance with precision by placing their heels where the quarters (or tees) mark their spots. I ask them to practice this setup
continuously
in
ten minute practice sessions with full concentration.
If you nail down your stance like this (even if it's square), and you practice it until it's second nature, all other things
equal your consistency
will absolutely improve.
Thomas Tucker - Class "A" Teaching Professional - WGTF "Top 100 Golf Teacher"
Can Help You Develop an Effective Golf Swing
[ Lessons ]
|
|